
FAQ
Maintenance and Care
When the projector detects an abnormal condition, it will be automatically shut down to protect the inside components of the projector.In this case, the LAMP indicator light will come on and other indicators will begin to blink. To confirm whether or not there is a problem, unplug the AC power cord then, plug it in again and then turn the projector on once again to verify operation. If the projector cannot be turned on and the indicators are still lighting and blinking, unplug the AC power cord and contact your EIKI dealer.
When the filter replacement icon keeps appearing on the screen when turning on the projector and no action is taken to replace the filter, the projector will be automatically shut down.
When the temperature inside the projector reaches a certain level, the projector will be automatically shut down.
If the temperature warning light is blinking, check:
- that there is appropriate space for the projector to be ventilated? Check the installing condition to see if the air vents of the projector are not blocked.
- if the projector been installed near an Air-Conditioning/Heating Duct or Vent? Move the installation of the projector away from the duct or vent.
- If the filter is clean? Replace the filter with a new one if necessary.
The filter prevents dust from accumulating on the optical elements inside the projector. Should the filter become clogged with dust particles, it will reduce cooling fans’ effectiveness and may result in internal heat buildup and adversely affect the life of the projector.
- LED (Light-Emitting Diode) Projectors
- Technology
- LED projectors use separate red, green and blue (RGB) lights to create images.
- Lifespan
- They can last for 20,000 hours or longer, depending on the model.
- Maintenance
- They require almost zero maintenance costs.
- Image Quality
- LED projectors serve up more vibrant and saturated colors than traditional lamp projectors.
- Advantages
- They’re some of the smallest and lightest projectors on the market.
- LED lights won’t harm the environment like mercury-containing bulbs.
- They’re more affordable than laser projectors.
- Technology
- Laser Projectors
- Technology
- Laser projectors rely on separate red, green and blue lasers.
- Lifespan
- They can keep working for at least 30,000 hours.
- Maintenance
- With no need to replace lamps or filters, maintenance drops to nearly zero.
- Image Quality
- Laser gives you the absolute best image quality with deeper, richer, more lifelike colors.
- Advantages
- Laser projectors use very little electricity.
- They offer the greatest durability, reliability, and longevity.
- With great viewing range, you can place them nearly anywhere.
- Disadvantages
- They’re more expensive than other projectors.
- They’re also likely to be bigger and heavier.
- Technology
- DLP (Digital Light Processing)
- How Does It Work?
- Small mirrors fixed on a chip called a Digital Micromirror Device (DMD) reflect light toward the screen while a color wheel creates sequential color.
- Where Is It Used?
- You’ll often find DLP projectors in movie theaters.
- What Are Its Advantages?
- Sharp image quality
- High Contrast Ratios
- Can handle fast motion
- Great for 3D
- Less maintenance than LCD
- What Are Its Disadvantages?
- Can’t render rich blacks
- Poor viewing range requires careful placement
- Can create a “rainbow” effect
- How Does It Work?
- LCD (Liquid Crystal Display)
- How Does It Work?
- Dichroic mirrors and red, green and blue liquid crystal panels are used to project an image onto the screen.
- Where Is It Used?
- Many Projectors and TVs use LCD technology.
- What Are Its Advantages?
- Better color saturation
- Can render blacks very well
- Less maintenance
- Better viewing range
- Affordable
- What Are Its Disadvantages?
- Noisy
- Cannot accommodate LED or laser lights
- LCD is brighter than DLP
- Requires more maintenance, such as cleaning filters
- How Does It Work?
You can view a list of Authorized Eiki service centers at https://www.eiki.com/authorized-service-centers/.
You can view a list of Authorized Eiki service centers at https://www.eiki.com/authorized-service-centers/.
Yes.
The LC-X85 is compatible with the CAT5 extender kit.
There is no way to know why a projector is shaking without having it checked by a qualified technician, but possible causes are: a fan may be malfunctioning which can cause this, or possibly a color wheel (DLP projector only) may be failing and this can also cause a shake.
There is no way to know why a projector is shaking without having it checked by a qualified technician, but possible causes are: a fan may be malfunctioning which can cause this, or possibly a color wheel (DLP projector only) may be failing and this can also cause a shake.
A projector's display is limited by the panel size (number of pixels), if a projector's panel size is 1280 x 800 pixels and the source (ie. laptop) has a resolution greater than 1280 x 800 the difference is made up with black bars on the top, bottom, and sides
Please contact an Authorized Eiki service center in your area for assistance.
You can view a list of Authorized Eiki service centers at https://www.eiki.com/authorized-service-centers/.
Restrike lamp fail 1 means that either the lamp is failing or the lamp ballast is failing, more often than not it is the lamp.
Divide the throw distance, from the front of the projector lens to the screen in inches, by the width of the projected image in inches.
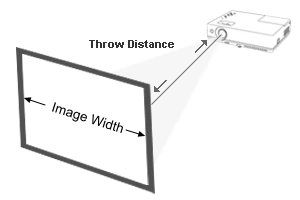
Example:
Formula: Throw Distance / Image Width = Throw : Width Ratio
Throw Distance = 10' (120 inches)
Image Width = 8' (96 inches)
Throw:Width Ratio = 1.25 : 1 (10' ÷ 8')
Current projectors have an item in the menu called "Information" which includes lamp hours.
If your projector is an older model, you can press and hold the Power ON/OFF button on the projector for approx. 20 seconds and the lamp hours will be displayed on the screen for a brief period of time.
Note:
It is recommended that you refer to the owner's manual that came with the projector for information and instructions related to your specific projector model.
Owner's manuals for EIKI projectors can be downloaded from the Eiki.com website by going to https://www.eiki.com/owners-manuals/ and searching for a projector model.
Here are a couple of examples on how to change image orientation for a projector.
Example 1
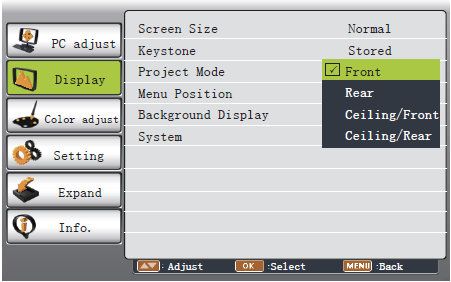
Project Mode
- This function is used to set the project mode.
Press MENU button on the remote control to display screen menu. Press button to
select Display, then press OK button.
button to
select Display, then press OK button. - Press button to select Project Mode, press OK button.
- Press button to select the item you want to set, press OK button.
Front.............. Project to front screen when projector is front standing.
Rear............... Project to rear screen when projector is front standing.
Ceiling/Front.. Project to front screen when projector is in ceiling state.
Ceiling/Rear... Project to rear screen when projector is in ceiling state.
Example 2
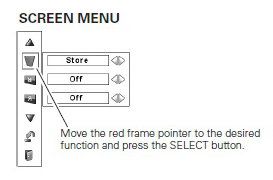
Operate the On-Screen Menu
- Press the MENU button on the projector or the remote control to display the On-Screen Menu.
- Use the Point
 buttons to select a Menu icon.
 - Use the Point buttons to select an item in the selected menu.
- Press the SELECT button to show the item data. Use the Point buttons to adjust the values.
To close the On-Screen Menu, press the MENU button again.
Note:- The selected item is not active until the SELECT button is pressed.
Menu Bar

7. Screen Menu
Used to adjust the size of the image. [Normal/True/Wide/Full screen/ Custom/ Keystone/ Ceiling/ Rear/ Reset/ Digital zoom +/–]
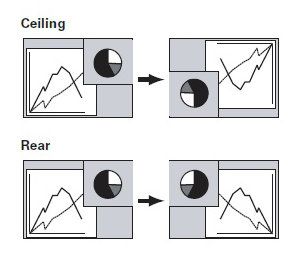
After selecting the Screen Menu icon (7), select the Ceiling or Rear icon from the screen menu.
************************************
 Ceiling
When this function is set to “On,” the picture is top/bottom and left/right reversed. This function is used to project the image from a ceiling-mounted projector.
 Rear
Rear
When this function is set to “On,” the picture is left/right reversed. This function is used to project the image from the rear of the screen.

6. Screen Menu
Used to adjust the size of the image. [Normal/ Wide/ Custom/ Keystone/ Ceiling/ Rear/ Reset]
After selecting the Screen Menu icon (7), select the Ceiling or Rear icon from the screen menu.
************************************
Ceiling
When this function is set to “On,” the picture is top/bottom and left/right reversed. This function is used to project the image from a ceiling-mounted projector.
Rear
When this function is set to “On,” the picture is left/right reversed. This function is used to project the image from the rear of the screen.
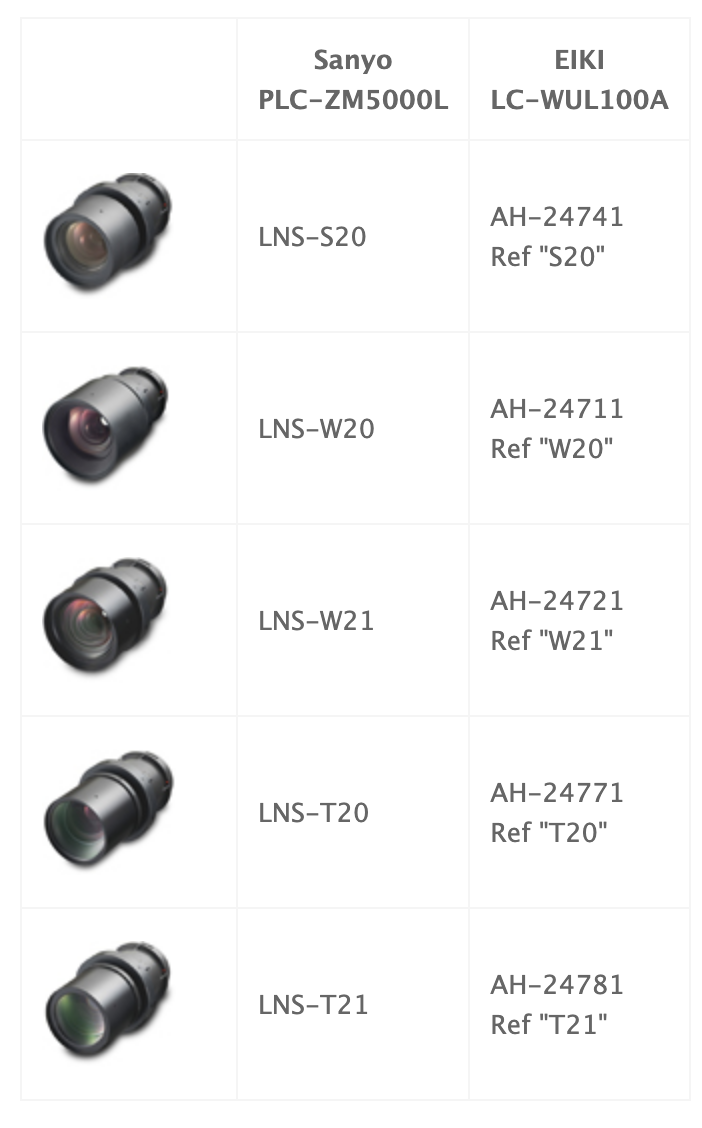
Where applicable, EIKI provides manufacturer's numbers for cross reference on their lens charts. If you know the mfg number for a Sanyo lens, look for the corresponding number in the "Ref" column on the EIKI lens chart.
Lens Charts for EIKI projectors can be searched for, and located, on the EIKI website at https://www.eiki.com/lens-charts/.
Question:
Will Sanyo lenses from a PLC-ZM5000L projector fit EIKI's LC-WUL100A projector?
Example
The mfg number of the "standard zoom lens" listed for Sanyo's PLC-ZM5000L is LNS-S20.
The "Ref" column on the EIKI lens chart for the LC-WUL100A lists a lens for "S20" (LNS-S20).

Therefore, the Sanyo lens with mfg number LNS-S20 can be used with EIKI's LC-WUL100A projector.
Answer:
After further examination of the lens chart for EIKI's LC-WUL100A projector, it is determined that the following Sanyo lenses for the PLC-ZM5000L projector can be used with EIKI's LC-WUL100A projector.
The Logo function for the projector allows you to choose the screen logo that is projected during start-up.
Note:
It is recommended that you refer to the owner's manual that came with the projector for information and instructions related to your specific projector model.
Owner's manuals for EIKI projectors can be downloaded from the Eiki.com website by going to https://www.eiki.com/owners-manuals/ and searching for your projector model.
Projector Menu
Enter the projector menu and navigate to the start-up logo option described by the owners manual for your projector.
Example:
- Press MENU button on the remote control to display screen menu.
- Press button to "Expand" the menu, then press the OK button.
- Press button to select the item you want to set, press the OK button.
- Press button to adjust the item, then press the OK button.
Logo select

This function decides on the start-up display from following options
Default .... Show the factory-set logo.
User..........Show the image captured by user.
Off ........... Show the countdown display only.
Capture
You can capture a projected image as start logo .
Select "Capture" and press the OK button.
Confirmation dialog box appears, select "Yes" to start capturing.
When the LEDs are flashing, they indicate that there is an abnormal condition that needs to be corrected.
Consult the "Indicators and Projector Condition" section in the owner's manual appendix for your projector to interpret the meaning of the LEDs. You can download the owner's manual for your projector here.
If more information than provided here is required, you can request support here.
A projector has built in sensors that monitor:
- Air filter status
- Air temperature
- Lamp status
- Internal functionality
In order to prevent serious damage to the projector, these sensors will turn off the lamp and put the projector in standby mode or failure mode.
Filter Warning
When the air filter sensor detects the filter is clogged, reaches a time set in the timer setting or reaches the end of the filter scrolls, the LED indicator will turn on indicating the filter should be replaced or cleaned depending on the model. If replacing an air filter cartridge, reset the filter counter and scroll counter in addition to replacing the air filter cartridge. In projectors with non-scrolling filters, clean the filter and then reset the filter counter.Abnormal Temperature Protection
If the temperature inside the projector rises too high, the temperature sensor will automatically turn off the lamp and the STATUS indicator(s) will start blinking. Follow the troubleshooting suggestions in the owner's manual.Lamp Status
When the projection lamp reaches its end of life, the LAMP REPLACE LED turns on. When this indicator lights, replace the projection lamp with a new one promptly and reset the lamp counter according to the projector model.Critical Shutdown
When the projector has an internal failure, the projector will completely shut off with either a combination of LEDs flashing or a solid warning LED depending on the model. The projector can not be restarted unless the power cord is disconnected from the projector and then reconnected. When this happens, call the Eiki technical support line at 1 (800) 242-3454 option 4 for assistance.A projector / lens combination may be capable of producing images less than or greater than the published minimum and maximum specs.
The Eiki lens calculator will state the supported minimum and maximum specs for a projector, but may calculate specs greater than or less than those published.
The Eiki lens calculator should only be used as an aid in determining throw distance and image width.
Always defer to the published minimum and maximum specifications whenever there is a question regarding Eiki lens calculator results.
First thing to do is isolate the projector from the rest of the system. You want to find out if the projector is the cause or if the problem is in the distribution system or source.
Use a different source device (DVD, PC etc.) and use a good short cable and go straight into the projector. Disconnect everything else from the projector except for the power cable.
If the image comes up, this means the projector input is working and you should then add the next part of the distribution system.
Keep adding parts of the system until the problem comes back and that is where the problem is.
Symptoms
- The projector runs for a couple of minutes but then goes back to its standby state.
- There are no warning LEDs lit.
Cause
This problem is more common with smaller projectors (medium to large projectors will normally display a LED warning to indicate why the projector shuts down). When small projectors shutdown with these symptoms, it usually means that the lamp is bad.Some newer projectors may display a series of blinking LEDs to indicate a lamp "failure to ignite" situation.
It is possible for a bad lamp to ignite and run for a short time and sometimes may even run for an extended time. These are gas filled lamps as opposed to filament bulbs so, they may behave much differently than you expect.
Symptoms
- The projector seems to be going through lamps much quicker than the original lamp.
- I just replaced my lamp.
- I purchased my lamp on line.
Cause
This is a common problem!Only Eiki dealers sell factory lamps for Eiki projectors!
People buy 3rd party lamps because they can cost much less the factory lamps. With lamps you get what you pay for!
Eiki's support department regularly sees problems with 3rd party lamps such as low lumens, short lamp life, failing to work at all, exploding and damaging the projector. Beware of 3rd party lamps. They can damage ballasts, power supplies and cables.
Note: Installing a 3rd party lamp in an Eiki Projector voids the Projector Warranty!
For more information on problems with 3rd party lamps, please visit the following link, www.genuine-lamps.com.What you are seeing is probably dust or dirt on one of the LCD panels. If you de-focus the image the blob or smudge should become a solid object.
The projector will need to be serviced to remove contamination of the projectors internal, optic components.
Routine maintenance (cleaning filters) will help prevent contaminants from getting into the projector.
1. The easiest way to re-negotiate the input signal handshake is to power cycle your devices.
- Power all devices off.
- Turn on projector.
- Ensure all Cables, Splitters, Switches, Extenders are connected if they are being used and turn them on.
- Turn on input device.
- Wait for the input device and projector to synchronize the input signal handshake / timing which may take 10 seconds or longer.
2. Dropped signals can be caused by cables if the pins are damaged or the cable does not conform to the correct specifications.
- Video flickering / dropping of signal can indicate a faulty cable. Change the cable to test if this is the case.
- Try using gold plated connector cables for best possible signal transfer on connections.
- Use the shortest possible cable between the devices.
3. Determine if there is a compatibility issue between devices.
- Splitters, switches, extenders and network devices may not support all frequencies or resolutions. For example, older splitters, switches, extenders and network devices may have been on the market before higher resolutions were introduced and therefore, be unable to handle the newer signals.
- Check to verify whether the source device and projector are HDCP compatible.
- Verify that the source device is set to output a digital signal. Many DVD players with DVI output need specific settings adjusted to output via the DVI port.
- Check to see that all the devices are using the latest firmware updates. If necessary, update the firmware or replace the device with a newer model.
4. Determine if there is a problem with devices connected between the source device and the projector.
- Connect the input device directly to the projector eliminating splitters, switches, extenders and network devices.
- Reconnect splitters, switches, extenders and network devices, one at a time, to determine if one of the devices is causing the problem.
5. Check for voltage spikes and drops in the power being supplied to the devices.
- Unstable voltage can cause input signals to be interrupted and/or dropped if devices are powered on for long periods without the input signal being refreshed.
- Signal drops can occur when the high power device such as an air-conditioning unit or heater switches on and is connected to the same circuit, electrical wall socket or electrical circuit-breaker that your devices are on.
- Voltage spikes and drops can cause damage your devices.
- If a laptop is being used as the source device, make sure the power supply is being used. Some laptops will disable non essential devices while on battery power.
6. Try switching to a different input source.
- Switch to VGA or HDMI port
- Try using a different computer or video device.
- Ensure the projector is set to the correct display mode.
- Plug the laptop into a power source. Some of the models have a power management scheme that will not allow for HDMI audio while running on batteries. Later, after you get your HDMI audio working, if you find that it still does not work on batteries you can change your power management settings in the Control Panel.
- HDMI has its own audio driver separate from the audio driver. HDMI audio is incorporated into the graphics card's driver so make sure you have the newest version of your graphics card driver. On models with Intel graphics the HDMI audio driver will appear in the Device Manager as "Audio Device on High Definition Audio Bus" or "Intel Display Audio".
- Turn off the computer and projector before connecting the HDMI cable. Later, after you get your HDMI audio working, if you disconnect the cable while the computer is running and lose your audio, try closing and then re-opening whichever program you were using that generates audio.
- Every time you try a different solution you should reboot the computer. HDMI audio is extremely finicky and seems to usually need a reboot.
Make the Connection:
- Connect the HDMI cable to the computer and projector. If the projector has a "DVI/HDMI" port do not use it. Use a port for HDMI only.
- Turn on the projector and select the HDMI port you are using. Adjust the projector settings to receive HDMI audio if any.
- Turn on the computer. (Optional, some people close the laptop lid immediately after hitting the power button but I am not sure why. Most people should not need to do this.)
- Optional. Some models do better if the projector is set to be the primary display. To set, repeatedly press Fn+F8 (or ctrl+alt+F4) to cycle through the settings (laptop display only -- laptop + projector -- projector only). Reboot the laptop.
- Go to Start>Control Panel>Sound>Playback tab. Make "HDMI" the default device. If "HDMI" is not there, right click in the white area and look under "Show Disconnected Devices" or "Show Disabled Devices" and see if it is there. (This applies only to Vista & 7. XP does not have "show disconnected devices". )
Post Connection Problems:
- If there is still no option to select "HDMI' as the default audio playback device, try re-installing or updating the graphics driver, or even try an older version. The graphics driver is the driver for HDMI audio, not the regular audio driver. A few people with Intel graphics had better results by uninstalling the graphics driver, rebooting, and letting Windows look for a driver (instead of downloading the driver from the Dell support site).
- Try disconnecting and then reconnecting the HDMI cable.
- If you are using Windows Media Player or Windows Media Center but get no HDMI audio even after it is selected as the default playback device, go to Control Panel>Sound>Playback tab>Audio/Playback device>HDMI>properties>Advance>Exclusive Mode and uncheck "exclusive mode".
- Try a different HDMI cable.
- Try a different HDMI port on the projector.
HDBaseT technology enables the optimized delivery of uncompressed, ultra-high-definition digital media, and allows you to connect all entertainment and content devices throughout the home and/or business. HDBaseT technology is 5Play™, is a feature set that converges uncompressed full HD digital audio & video, 100BaseT Ethernet, USB, up to 100 watts of power and various control signals through a single LAN cable (Cat5e or above), for up to 100m/328ft.
Class A is the traditional HDBaseT product, able to support all 5Play features and transmits for up to 100m/328 ft.
Class B is a more cost-effective solution for certain applications that do not require such distance and all features. It supports distances of up to 70m/230ft, and does not support Ethernet functionality.
HDBaseT was developed to work with the most basic LAN infrastructure, namely Cat5e cables, however, best practice is to use Cat6 cable in HDBaseT installations, for better performance and error-free transmission.
HDBaseT enables full ultra-HD/3D and 2K/4K uncompressed video, and is compatible with all HDMI formats. It provides the highest video quality, with zero latency, and directly relays digital audio from the HDMI chipset. It supports all audio standard formats, including TrueHD,DTS HD-Master Audio, Dolby Pro Logic Iiz 7.1 & 9.1, and more.
No. Although it uses an Ethernet jack (RJ-45) HDBaseT is based on a different protocol that standard Ethernet equipment cannot work with. Future generations of HDBaseT will include HDBaseT switches that will allow HDBaseT networking.
No. HDBaseT utilizes the existing Ethernet infrastructure Cat6 LAN cables, Ethernet in-wall passive connectors and RJ45 Ethernet jacks.
HDBaseT is fully backward-compatible with Ethernet protocol, and connected devices can automatically switch to Ethernet communication mode only.
The HDBaseT logo indicates the product has been certified by the HDBaseT Alliance. It is the Alliance’s priority to encourage its members to submit their products for testing and certification, and to educate the professional installers’ community to look for the HDBaseT logo.
No. HDBaseT products are certified for the features they support according to the HDBaseT standard, but not all HDBaseT products support all 5Play features. In addition, there may be interoperability issues not related to HDBaseT that may affect operation. Manufacturers may implement proprietary features not related to HDBaseT that may interfere with interoperability in general.?
Yes, HDBaseT supports both for total protection of copyrighted content.
No. HDBaseT transmits signal either through a LAN cable or fiber cable
No. HDBaseT works with and supports HDMI. HDBaseT is fully HDMI-compliant. While HDMI transmits high definition video over very short distances. HDBaseT can extend signal transmission for up to 100m/328ft.
HDBaseT delivers full high definition, including 3D, and 2K/4K uncompressed video. HDBaseT supports all key HDMI 2.0 features, including EPG, CEC, EDID and HDCP.
HDBaseT adds virtually no latency to the signal – less than 10 microseconds over 100m of cable.
HDBaseT supports 100Mb Ethernet alongside the video, audio and other 5Play features being sent over the same cable.
Unlike other HD distribution technologies currently available, HDBaseT is the only technology that enables long-reach wired connectivity for up to 100 meters (328 feet) for uncompressed ultra-HD multimedia content and up to 100 watts of charging power via a single cable. HDBaseT is optimized for video applications and can connect all HDBaseT-enabled home entertainment devices by providing the 5Play convergence. Other existing solutions may require a specific cable and/or new proprietary connectors while HDBaseT utilizes existing Ethernet infrastructure.